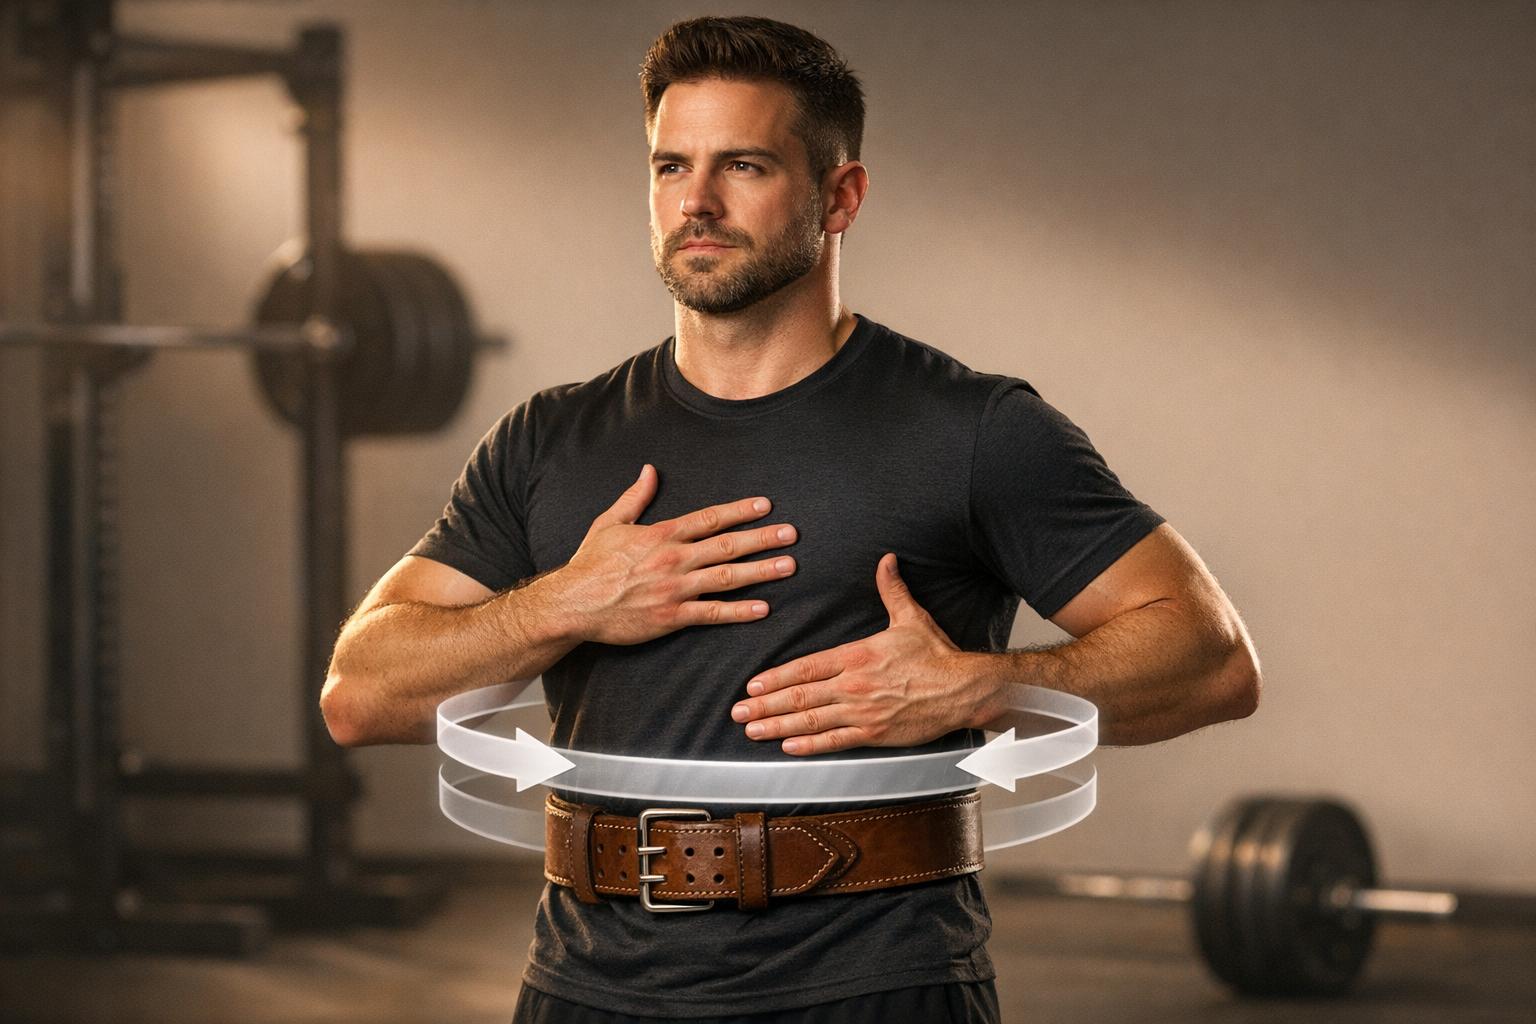
Breathing and Bracing for Squats and Deadlifts
Want to lift heavier and stay safe? Proper breathing and bracing are the keys. Here's why:
- Protect Your Spine: Bracing reduces spinal compressive forces by up to 40%.
- Boost Strength: Using techniques like the Valsalva maneuver can improve your squat 1RM by 12%.
- Stabilize Your Core: Diaphragmatic breathing and intra-abdominal pressure (IAP) create a solid, pressure-filled cylinder in your torso.
- Avoid Common Mistakes: Issues like chest breathing, exhaling mid-lift, or losing tension can compromise your performance and safety.
Quick Tips:
- Expand your belly and sides (not your chest) with each breath.
- Brace by pushing your abs outward in all directions.
- Maintain a neutral spine with your ribcage stacked over your pelvis.
- Use drills like supine breathing and Dead Bug to practice bracing.
- For heavy lifts, consider a belt but only after mastering natural bracing.
Proper breathing and bracing aren’t optional - they’re essential for lifting safely and maximizing your strength. Let’s break it down step by step.
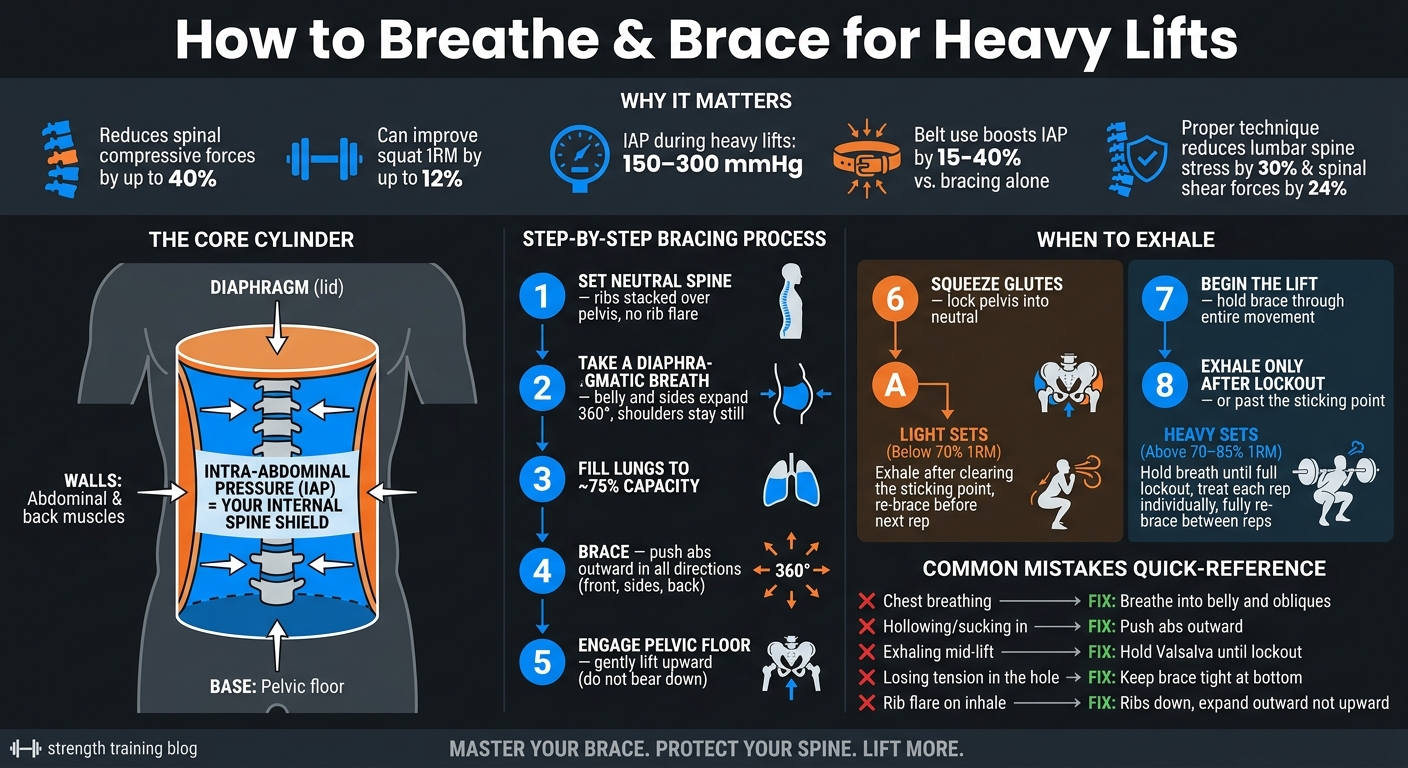
How to Breathe & Brace for Squats and Deadlifts
The Basics of Breathing and Bracing
What Is Bracing and Why Does It Matter?
Bracing is the intentional tightening of your midsection before and during a lift, turning your torso into a pressurized column capable of handling heavy loads. Instead of simply sucking in your stomach, bracing involves actively pushing outward in all directions.
This full-core activation helps protect your spine by reducing the forces compressing and shearing it during movements like squats and deadlifts. It also enhances force transfer - allowing more of the power generated by your legs to reach the bar, rather than being lost through an unstable core.
"A strong brace should feel as if you're pressurizing your torso from the inside rather than cinching it inward." - Garett Reid, NSCA, CSCS, SET FOR SET [2]
How Diaphragmatic Breathing Builds Stability
Diaphragmatic breathing, often referred to as "belly breathing", is the cornerstone of effective bracing. When you breathe this way, your diaphragm moves downward as you inhale, pushing into your abdominal cavity. This causes your belly and sides to expand outward, while your shoulders remain still. If your shoulders rise, the breath is too shallow to provide the stability you need [1][4].
To check your technique, place your thumbs on your obliques (the sides of your torso) as you inhale. You should feel them expand outward. This outward movement creates the pressure your core muscles need to brace against [1][2].
"Breathing is not bracing, it allows us to brace more effectively." - Kevin Cann, Director of Strength and Conditioning [9]
What Is Intra-Abdominal Pressure?
Intra-abdominal pressure (IAP) refers to the internal pressure created within your abdominal cavity when you combine diaphragmatic breathing with bracing. Imagine your torso as a sealed cylinder: the diaphragm forms the top, the pelvic floor is the base, and your abdominal and back muscles make up the walls. When you fill this "cylinder" with air and contract the walls, pressure builds, stiffening the entire structure [1][10].
This stiffness is key to protecting your spine. During heavy lifts, IAP can exceed 150 mmHg, and during maximum efforts, it can reach 200–300 mmHg [1][4]. Studies suggest that generating sufficient IAP can reduce spinal compressive forces by as much as 40% [1].
"This pressure acts as a hydraulic support for your spine. Your abdominal cavity becomes a pressurized column that resists compressive forces from the barbell." - Lift5x5 Team [1]
To create proper IAP, both breathing and body alignment must work together.
Neutral Spine and Ribcage Position
Before bracing, your body needs to be in the right alignment. Specifically, your ribcage should be stacked directly over your pelvis, which ensures your diaphragm and pelvic floor are parallel. This positioning is crucial for generating maximum IAP [3][11].
If your ribs flare or your lower back arches excessively, this alignment is thrown off. As a result, pressure escapes, bracing becomes less effective, and your lumbar spine is exposed to unnecessary stress [3][1]. To set up correctly before a heavy lift, think of the cue: ribs down, pelvis neutral. From this position, you can breathe and brace effectively.
How to Practice Bracing Without a Barbell
Finding Proper Posture and Alignment
To master core bracing, start by focusing on your posture without adding weight. Stand with your feet hip-width apart, ensuring your ribcage is aligned over your pelvis. Keep your head in line with your spine - no forward jutting.
Next, place your thumbs on your obliques and your fingers on the front of your abs. Slowly breathe into your belly, pushing your thumbs and fingers outward simultaneously. This 360-degree expansion - covering the front, sides, and back - shows you're activating your entire core. If only your stomach pushes forward, you're not creating enough pressure around the "cylinder" of your core.
"Proper bracing isn't just about protecting your spine - it's about creating a rock-solid foundation that transfers power efficiently from head to toe." - Guilford Athletic Center [6]
Drills to Build Your Brace
Start with the supine breathing drill. Lie on your back with your knees bent and feet flat. Place one hand on your chest and the other on your belly. Inhale so that only your belly rises, while pressing your lower back into the floor. This helps you practice diaphragmatic breathing and prevents chest-breathing.
Once you've nailed that, move on to the Dead Bug drill. Stay on your back, press your lower back into the floor, take a deep belly breath, and brace hard. Then, slowly extend one leg straight out. If your lower back lifts off the floor, your brace isn't holding. Reset and try again. This exercise highlights weak spots in your bracing pattern without any added weight [8][12].
"Breathing was most effective in strength athletes when the lungs were ¾ full and the breath was held for a short amount of time." - Kevin Cann, Director of Strength and Conditioning [9]
Instead of taking a massive gulp of air, aim to fill your lungs to about ¾ capacity. Overfilling can throw off your positioning and waste energy you need for the lift [9]. These drills are key for creating a solid base for heavier, loaded movements.
Engaging the Pelvic Floor and Glutes
Think of your core as a sealed cylinder: the diaphragm is the lid, your muscles form the walls, and the pelvic floor is the base. If the base isn't engaged, pressure escapes no matter how strong the upper brace is.
When you inhale to brace, your pelvic floor naturally expands downward. As you hold the brace, gently lift those muscles upward. Avoid bearing down, which pushes pressure in the wrong direction and can lead to long-term issues [7][13].
"As you brace, think about gently lifting your pelvic floor. If you don't lift the muscles (and instead, bear down as if you're going to the bathroom), all of the pressure may push down in this area and lead to leaking." - Dr. Sarah, Physical Therapist [7]
Combine this with a glute squeeze. Contracting your glutes locks your pelvis into a neutral position, preventing your lower back from overcompensating during lifts [7]. Practice this combination - pelvic floor lift and glute squeeze - while standing and holding your brace. This prepares you for transferring power effectively during squats and deadlifts.
When and How to Use a Lifting Belt
A lifting belt helps increase intra-abdominal pressure (IAP) by providing resistance for your abdominal wall. Studies show belts can boost IAP by 15% to 40% compared to bracing alone [1].
However, belts are best saved for heavier sets - usually above 85% of your one-rep max. Using one too early can hide weaknesses in your natural bracing technique.
To wear it correctly, position the belt over your lower abs, not your hip bones. When you brace, your entire midsection should press outward into the belt. A quick test: you should be able to slide one or two fingers between the belt and your skin before bracing. Once you inhale and brace fully, those fingers should be locked in place by the pressure [1][2].
"A strong brace should feel as if you're pressurizing your torso from the inside rather than cinching it inward." - Garett Reid, NSCA, CSCS [2]
When used properly, a belt enhances your bracing technique, helping protect your spine during heavy lifts.
The RIGHT Way to Breathe & Brace for Heavy Lifts
Breathing and Bracing for Squats
Let’s take the basics of core bracing and see how they work in the context of squats.
How to Breathe Before Unracking the Bar
Before you even think about lifting the bar, set yourself up properly. Step under the bar, position your feet, and tighten your upper back to create a stable "shelf." Then, take a deep diaphragmatic breath - expand your belly and lower ribs - and brace your core in all directions (a full 360°). Only after securing this brace should you unrack the bar.
Why does this order matter? The moment the bar leaves the rack, your spine is under stress. Bracing first turns your torso into a solid column, ready to handle the load.
"Breathe into your ribs and belly, not just your collarbones." - Admins @ FitnessForLifeCo [11]
Keeping Tension During the Descent
Once the bar is unracked, hold your brace and avoid breathing until the rep is finished. During the descent, your torso needs to stay rigid, especially as you approach the bottom of the squat (the "hole"). This is the point where you're most vulnerable to losing pressure, which can cause your back to round or the lift to fail.
Studies show that intra-abdominal pressure (IAP) can reduce lumbar spine stress by up to 30% and decrease spinal shear forces by 24% [14]. Think of IAP as your internal support system - it’s your shield against injury, so don’t let it go too soon.
"Never breathe in the hole (bottom of the squat). You're in the weakest, most compressed position. Losing pressure there is how backs round and lifts fail." - Lift5x5 Team [1]
Breathing on the Way Up
The ascent is where your breath control is most critical. Hold your breath until you’re past the sticking point - usually the midpoint of the lift - where IAP is doing the most work. For heavy sets (above 70% of your one-rep max), hold your breath until you reach lockout, then exhale in a controlled manner. For lighter sets (below 70% 1RM), you can exhale after clearing the sticking point and reset your brace before the next rep.
"If the barbell is moving, you're not breathing." - Phil, Testify Strength & Conditioning [5]
Avoid rushing through reps or sacrificing your brace - proper breathing and bracing are key to staying safe and strong.
Common Squat Bracing Mistakes and Fixes
| Mistake | What Happens | Fix |
|---|---|---|
| Chest breathing | Doesn’t create enough IAP | Focus on expanding your belly and lower ribs instead |
| Hollowing (sucking in) | Leaves your spine unsupported | Push your abs outward in all directions |
| Exhaling on the descent | Increases injury risk | Hold the Valsalva maneuver until after the sticking point |
| Losing tension in the hole | Leads to back rounding or failed lifts | Keep your brace tight at the bottom - never relax |
| Holding breath across multiple reps | Can spike blood pressure or cause dizziness | Re-brace at the top of each rep, especially on heavy sets |
Another common issue is rib flare during your initial breath. This can disrupt the alignment between your diaphragm and pelvic floor, weakening your internal pressure. To avoid this, keep your ribs down as you inhale and focus on expanding them outward, not upward.
Getting your breathing right before the rep starts is non-negotiable. Under heavy load, there’s no room for error - your body won’t let you breathe and brace at the same time. Nail the breathing first, and you’ll set yourself up for a solid lift.
Breathing and Bracing for Deadlifts
The deadlift relies on the same diaphragmatic breathing and 360-degree bracing techniques used in squats, but the setup demands a higher level of precision. As Barbell Logic explains:
"The deadlift is the hardest lift to get set up for and to breathe and brace properly. The bottom position is uncomfortable, and many people struggle to set their back properly." - Barbell Logic [15]
Breath Timing and Setup for the Deadlift
While the foundation of bracing is similar to squats, the deadlift requires some fine-tuning due to its unique mechanics. You can brace either while standing or after gripping the bar, but the key is to have your brace locked in before the bar leaves the ground. Rushing through this step increases the risk of injury [16].
Unlike the squat, avoid over-expanding your belly, which can throw off your hinge position. Instead, aim for a compact, firm brace by pushing your abs outward in all directions - front, sides, and back - while keeping your torso rigid. This keeps your hinge position intact. Once braced, engage your lats by imagining someone tickling your armpits. This cue helps stabilize your upper back and pelvis while keeping the bar close during the pull.
With your brace and grip locked in, the focus shifts to maintaining that stability throughout the lift.
Holding Your Brace Through the Pull
Before starting the pull, eliminate slack in the bar until the plates align with the sleeve. This pre-pull tension ensures a smooth start and prevents your brace from collapsing. Think of the initial movement as pushing the floor away with your legs rather than pulling with your back. This strategy helps maintain a neutral spine and a solid brace.
A firm grip can increase lat and core activation by about 18% [16]. To keep the bar path straight, ensure it stays in contact with your shins. If the bar drifts forward, the lever arm on your lower back increases, putting your brace at risk.
"The Valsalva maneuver isn't optional for heavy lifting - it's a biomechanical necessity for both safety and performance." - FitnessRec [4]
Hold your breath throughout the pull. The intra-abdominal pressure created by a strong brace can reduce spinal compression by up to 40% [1]. Exhaling too soon weakens that protection.
Exhaling at Lockout and Re-Bracing Between Reps
Once you've completed the pull, you can exhale - but only after the rep is fully locked out. For dead-stop sets, lower the bar, exhale completely, take a deep breath, and re-brace before the next rep. For touch-and-go sets, re-brace quickly at the top or during the brief pause [2][8]. Be mindful to reset with one or two short breaths to maintain focus and rhythm.
For heavier sets (above 85% of your one-rep max), treat each rep as an individual effort. Fully reset your brace between reps, as a compromised brace often leads to injuries by the third or fourth repetition.
Common Deadlift Bracing Mistakes and Fixes
| Mistake | What Happens | Fix |
|---|---|---|
| Chest breathing | Shoulders rise, reducing lower IAP | Focus on breathing into your belly and obliques, not your chest |
| Hollowing (sucking in) | Lowers IAP, weakening spinal support | Push your abs outward in all directions |
| Exhaling during the pull | Drops internal pressure at a critical moment | Hold your breath until lockout or when the bar returns to the floor |
| Neglecting the lats | Bar drifts forward, straining the lower back | Use the "armpits in your pockets" cue before pulling |
| Over-tightening a belt | Restricts abdominal movement, limiting IAP | Ensure the belt allows one to two fingers' width of space |
| Excessive belly expansion | Disrupts hinge position at setup | Focus on creating a tight, cylindrical brace |
"The deadlift punishes a soft brace because the bar wants to pull you into flexion." - Fitsse [17]
Most of these mistakes can be corrected by slowing down your setup. A rushed breath, a weak brace, or skipping lat engagement might seem harmless with lighter weights, but these habits can lead to problems as the weight increases.
Using CueForm AI for Personalized Feedback
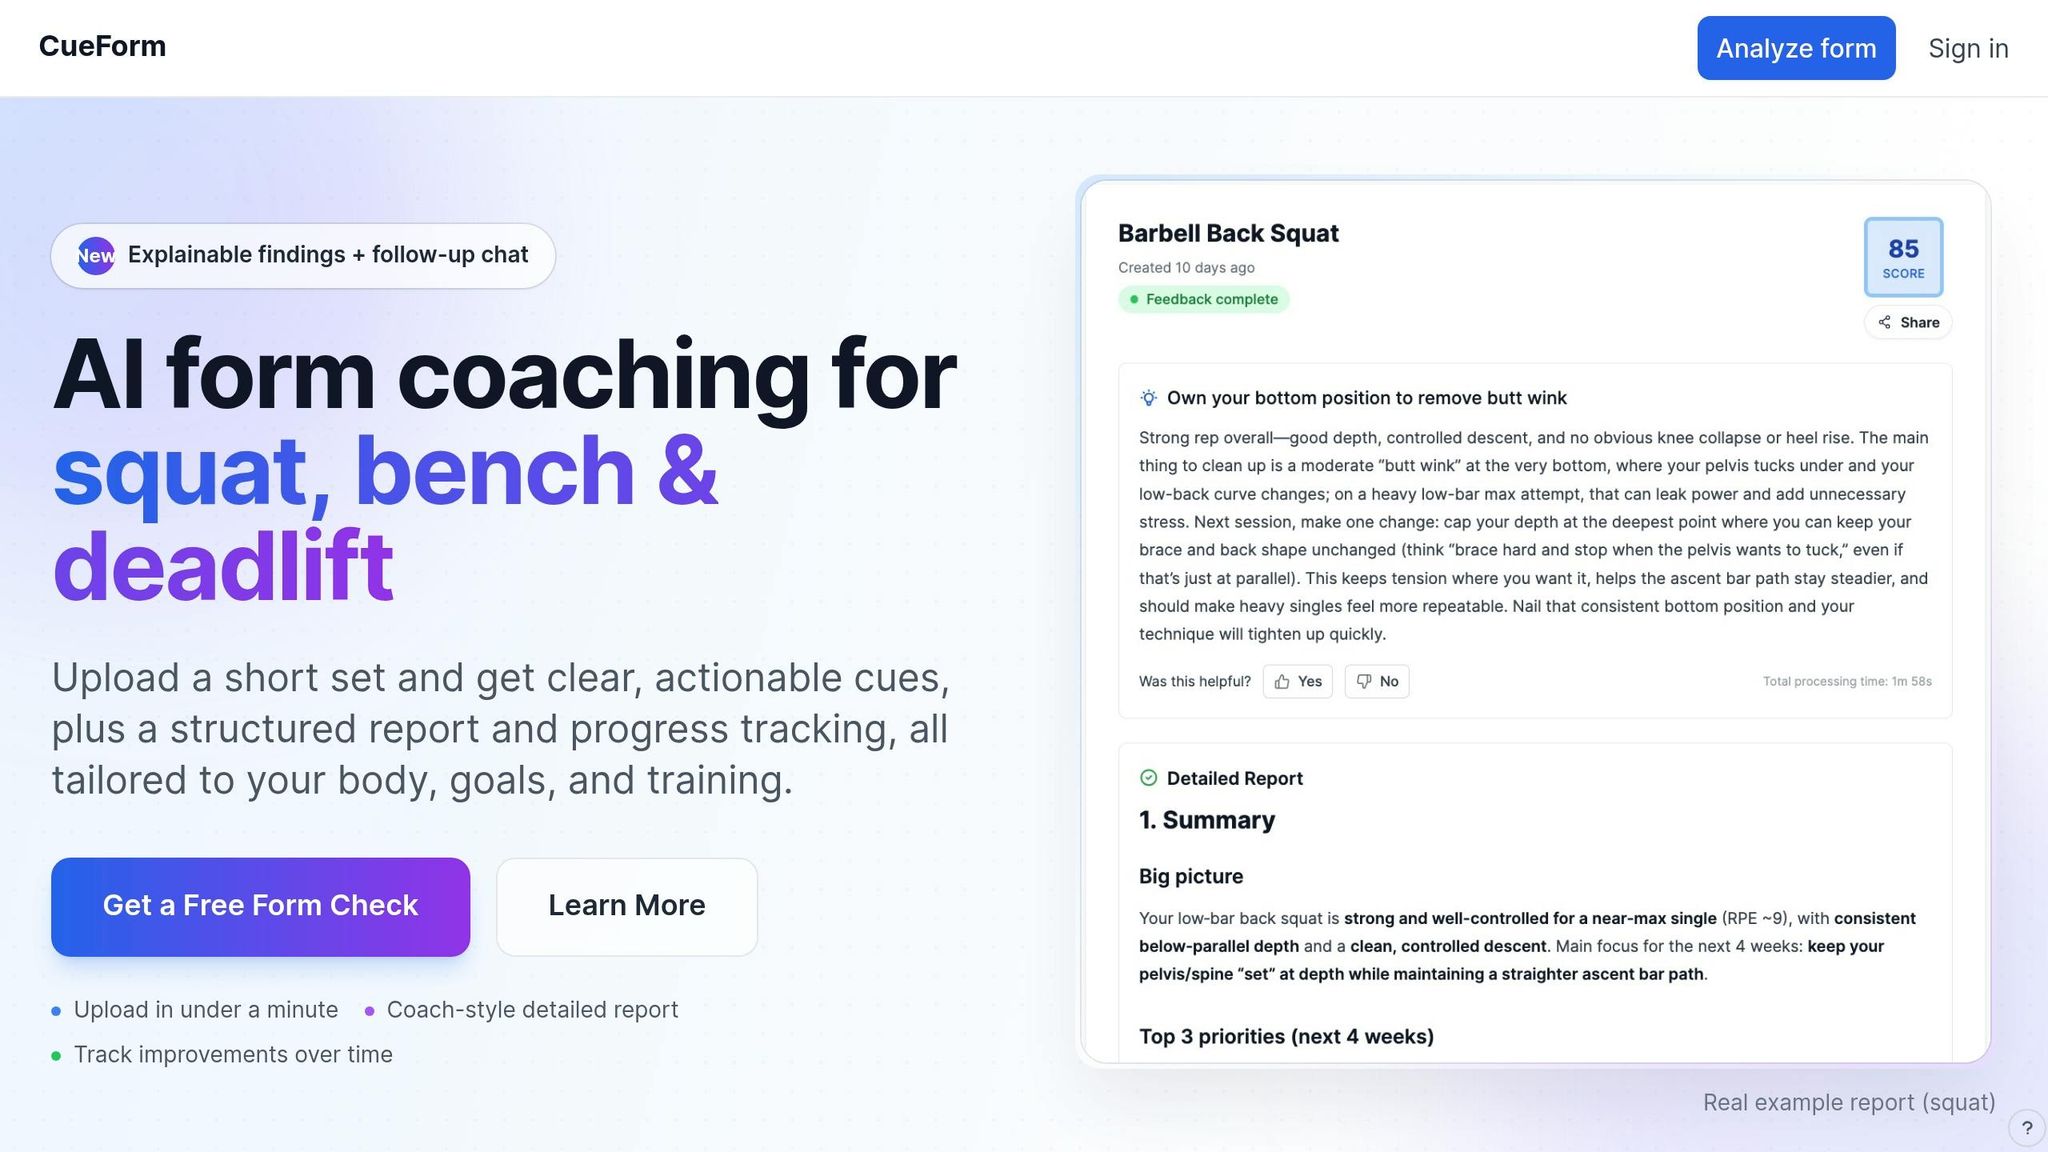
Understanding proper breathing and bracing is one thing - putting it into practice during a heavy lift is a whole different challenge. Many lifters struggle to bridge the gap between theory and execution, and getting it right in real time is key to safer, more effective lifts. That’s where CueForm AI comes in.
Video Analysis for Breathing and Bracing
With CueForm AI, you can upload a video of your squat or deadlift, and the platform will analyze your form in detail. It tracks critical joint positions and spinal alignment, looking for signs of a compromised brace. For example, it can detect issues like unwanted lumbar flexion, excessive forward lean, or a bar drifting out of position during a deadlift. These are clear indicators of a drop in intra-abdominal pressure, which is essential for maintaining proper bracing.
To get the most accurate feedback, record your lifts from both the side and the front. This ensures the AI captures all the necessary metrics for its analysis [18]. The result is a detailed breakdown that sets the foundation for personalized improvements.
Personalized Cues and Progress Tracking
CueForm AI takes its analysis a step further by providing feedback tailored specifically to you. Instead of generic advice, it offers precise cues based on what it observes in your video. For instance, if it notices you’re chest-breathing instead of using your diaphragm, it will call that out. Each lift is scored and logged, giving you measurable data to track your progress over time.
The app also allows you to set training goals and frequency targets, helping you stay consistent in practicing proper bracing techniques. As CueForm explains:
"See what's improving over time with consistent metrics and a clean history of your checks." - CueForm [19]
This combination of personalized feedback and progress tracking makes it easier to pinpoint what’s working and where you need to focus.
Getting Follow-Up Coaching from the AI
Once you’ve reviewed your feedback, you can take things further by chatting with the AI coach. If any cue feels unclear, the coach provides additional drills and explanations tailored to your anatomy, training history, and goals. This makes it simple to apply corrections and improve before your next set.
Conclusion: Better Lifting Through Proper Breathing and Bracing
Breathing and bracing aren’t just small details - they’re the backbone of safe and effective lifting. When executed correctly, they protect your spine and help transfer force efficiently from the ground to the bar. In fact, research shows that proper technique can reduce spinal compression by up to 40% while boosting lifting capacity by 10–20% [4]. That’s a game-changer for anyone serious about strength training.
The key to mastering these techniques is consistent, deliberate practice. Focus on breathing deeply into your belly and creating a full 360° core brace before starting each lift. Hold that brace through the entire movement until the rep is complete. As Starting Strength coach Phil Meggers puts it:
"Breath is stability, so hold that breath until you're back where you started." [5]
Repetition is what turns this process into second nature. Treat every warm-up set as a chance to perfect your brace, not just the heavy lifts. Over time, this habit becomes automatic, ensuring your technique holds up under pressure.
For real-time insights into your lifting form, tools like CueForm AI can be a game-changer. This platform provides objective feedback on your bracing and body positioning to fix common squat mistakes. You can upload a video of your lift and receive personalized cues to improve your form. The free plan offers unlimited quick checks with actionable tips, while the Starter plan, priced at $10/month, unlocks unlimited detailed reports for deeper progress tracking. Combining proper technique with targeted feedback helps you lift more effectively and reduces the risk of injury.
Improving your breathing and bracing takes focus and consistency, but the rewards are worth it. With the right tools and practice, you’ll see gains not only in performance but also in protecting your joints for the long haul.
FAQs
How do I know I’m really doing a 360° brace?
To see if you're doing a proper 360° brace, think about bracing as if you're preparing for a punch to the stomach. Instead of just flexing your abs or pulling your stomach in, expand your core outward in all directions - front, back, and sides. This creates tension by engaging your diaphragm to push downward, building intra-abdominal pressure, much like the stability of a sealed soda can. If you're not sure about your form, CueForm AI can analyze your technique and give tailored feedback to help you perfect your bracing.
Is the Valsalva maneuver safe if I have high blood pressure?
If you have high blood pressure, it's best to steer clear of or adjust the Valsalva maneuver. This technique causes a temporary spike in blood pressure and puts extra strain on your cardiovascular system. Experts strongly discourage its use, particularly for individuals with uncontrolled hypertension. To train more safely, CueForm AI offers an analysis of your squat and deadlift form, helping you refine your technique while keeping performance, safety, and movement quality in check.
How should my breathing change for high-rep sets or conditioning?
When performing high-rep sets or conditioning exercises, it's best to avoid the Valsalva maneuver, which involves holding your breath under heavy load. Instead, focus on continuous breathing while keeping your core engaged. This approach helps minimize blood pressure spikes and provides spinal support during lighter loads and higher repetitions.
Stick to a steady inhale-exhale rhythm and maintain a tight midsection throughout your movements. If you're looking for tailored guidance to fine-tune your breathing and bracing techniques, CueForm AI can provide valuable insights to enhance your performance.