How AI Identifies Movement Errors in Workouts
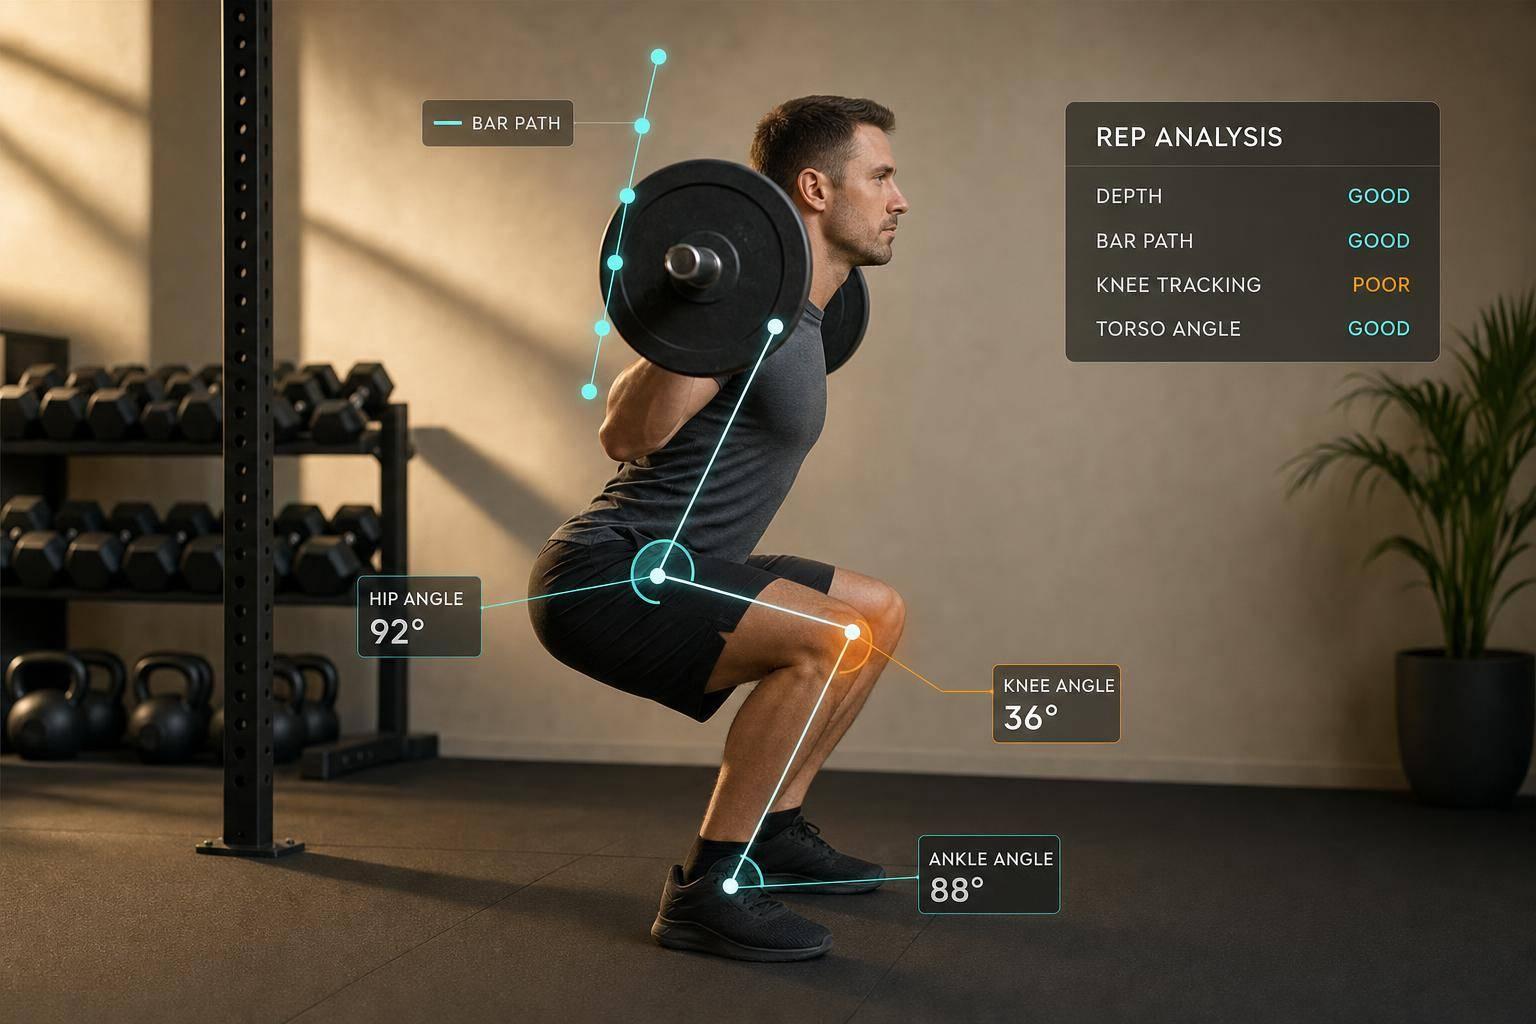
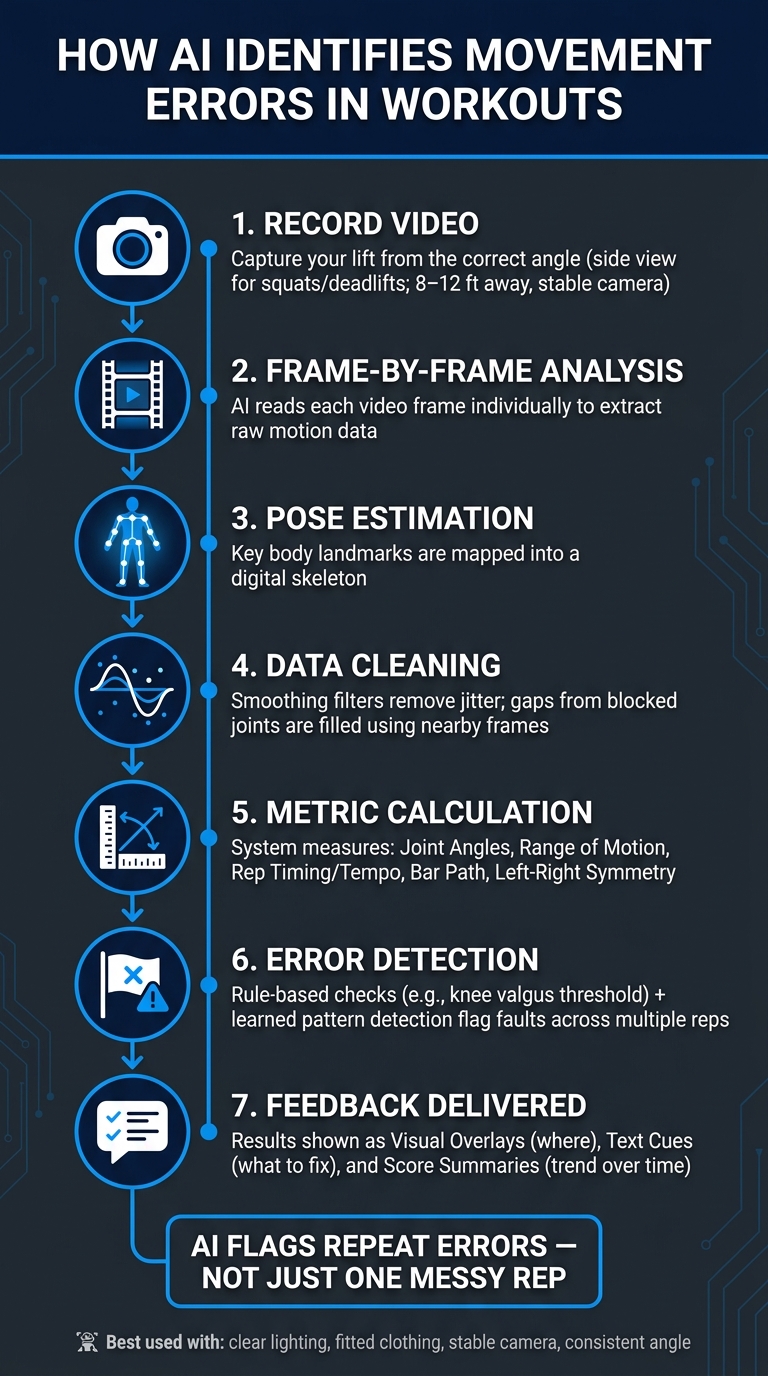
AI can spot repeat form mistakes by turning your workout video into joint angles, bar path data, rep timing, and left-right checks. In plain English: I record a lift, the system reads it frame by frame, and it flags patterns like knee cave, shallow squats, elbow flare, lumbar rounding, or bar drift.
Here’s the short version:
- It reads video frame by frame
- It maps joints into a digital skeleton
- It cleans shaky or blocked data
- It measures angles, range of motion, tempo, and bar path
- It compares those numbers to form rules and learned lift patterns
- It flags repeat errors across reps, not just one messy rep
- It works best with clear video, stable camera setup, and the right angle
A few practical points stand out right away:
- For squats and deadlifts, a side view usually gives the clearest read on depth, back position, and bar path
- Keeping the camera about 8 to 12 feet away can help keep your full body in frame
- AI can track form over time, but it can’t measure pain, fatigue, or what the camera can’t see
What matters most is this: AI is good at finding repeat movement faults, not replacing coaching or judgment. I’d use it to test one fix at a time, keep the camera angle the same, and watch whether the same error shows up again next session.
How AI Analyzes Your Workout Form: Step-by-Step
Creating Your Own AI Fitness Trainer: Analyzing Squats with MediaPipe
How AI Reads Workout Video Frame by Frame
The system looks at a lift one frame at a time, then stitches those frames back together into one motion sequence.[1] Each frame becomes the raw material for pose estimation.
Pose estimation: turning joints into a digital skeleton
On every frame, the model tags key body landmarks like the shoulders, hips, knees, ankles, elbows, and wrists. It then connects those points into a body map for that moment in time. Across the whole clip, that creates a frame-by-frame record of how you moved from the first rep to the last.
In many cases, a single-camera 2D view is enough to track joint angles, bar path, and depth during squats, bench presses, and deadlifts.
How the system cleans up motion data
Pose data can get messy. It may jitter from frame to frame because of poor lighting or clothing that hides part of a joint. To deal with that, the system uses smoothing filters to cut down on the shake and build a steadier motion curve.
If a joint drops out for a moment, the system can fill in the gap using nearby frames instead of marking that point as missing. For example, if a barbell hides your hip at the bottom of a deadlift, the model can estimate where that joint likely was. But there’s a limit. If joints stay blocked for too long, or the video itself is weak, the system can miss actual form issues or mark problems that aren’t there.
Once that motion data is cleaned up, the system can track angles, paths, and timing with better consistency.
How to record video for more accurate analysis
Video quality shapes how much the system can rely on what it sees. In most home and gym setups, a few simple rules do most of the heavy lifting:
- Keep your full body in frame. Set the camera far enough back - about 8 to 12 feet - so your head and feet stay visible for the whole rep.[1]
- Use a stable surface. A tripod, bench, or even a gym bag can help keep the camera from moving.
- Shoot from the side for squats and deadlifts. That angle gives the AI a clean view of hip depth, knee angle, back position, and bar path.
- Use an angle that clearly shows bar path, elbow position, and touch point on bench press.
- Prioritize lighting. Bright, even light works much better than a dark corner, especially if the light is in front of you instead of behind you.
Fitted clothing also tends to help because it keeps joint outlines easier to see. Better video gives the system cleaner signals to work with in the next session.
With clean frame data in place, the next step is comparing those measurements against form rules and movement patterns.
The Metrics AI Uses to Spot Form Problems
Once the pose data is clean, AI turns movement into numbers it can track: joint angles, range of motion, timing, bar path, and symmetry. Those signals help the system move from raw motion to specific form flags.
Joint angles, range of motion, and rep timing
The most basic metric is the joint angle - the bend at a joint in a single frame. The system calculates it by using three keypoints, like the hip, knee, and ankle, and measuring the angle between them. It repeats that process for every frame, which creates a time-series curve for each joint across the full rep.
From that curve, two more metrics come into play. Range of motion (ROM) is the difference between the maximum and minimum angle a joint reaches during a rep. A squat is a good example: it shows how far the knee moves from full extension at the top to maximum flexion at the bottom. Rep timing breaks the lift into the lowering, pause, and lifting phases by spotting the moment the movement changes from lowering to lifting.
That matters because it lets the system point to when the problem shows up, not just that something went wrong. If the lumbar spine angle stays steady through most of the descent but shifts near the bottom, the system can flag rounding at the bottom instead of labeling it as a general bad back position. If the concentric phase slows hard at mid-range, that sticking point is often where compensations like knee cave or hips rising first start to show.
Bar path and movement symmetry
Bar path follows the barbell frame by frame. In squats and deadlifts, a good bar path stays close to vertical over the mid-foot. In the bench press, it tends to follow a controlled arc. When the bar drifts forward during a squat descent, that often points to ankle mobility limits, loss of upper-back tightness, or a balance problem. In deadlifts, a bar that moves away from the body during the initial pull can signal poor positioning off the floor.
Movement symmetry compares the left and right sides of the body - knee angles, hip angles, hand positions, and velocities. Clear left-right differences are worth checking because they can point to a mobility deficit, compensation from a previous injury, or a setup habit that puts more load on one side. This metric usually needs a front or rear camera angle, so it’s often easier to read from that view.
Comparison table: what each metric measures and where it helps most
| Metric | What It Measures | Where It Helps Most | Main Limitation |
|---|---|---|---|
| Joint Angles | Degrees of flexion/extension at the knee, hip, elbow, and spine | Detecting pelvic tuck at the bottom of a squat, flared elbows, and rounded back | Poor angles or blocked joints reduce accuracy |
| Range of Motion | Total joint travel between the start and end of a rep | Flagging shallow squats, incomplete deadlift lockouts, and missed bench touch points | Doesn't capture how the lifter moves between endpoints |
| Rep Timing / Tempo | Duration of eccentric, pause, and concentric phases | Spotting dive-bombing, loss of tension, or fatigue-driven tempo drift | Requires sufficient frame rate for reliable phase detection |
| Bar Path | Vertical and horizontal trajectory of the bar across the rep | Identifying forward drift in squats/deadlifts and inconsistent bench arc | Requires a side or slightly angled view for high precision |
| Symmetry | Left-to-right differences in joint angles, ROM, and velocity | Detecting knee cave, uneven lockout, or lateral bar tilt | Needs a front or rear view, which can make other metrics harder to read |
Next, the system applies these measurements to specific lifts and labels the errors they reveal.
How AI Flags Errors in Squats, Bench Presses, and Deadlifts
Once AI has the angles, bar path, and timing, it matches that data to specific technique mistakes. Put simply, it takes cleaned movement data and turns it into fault labels using two main detection methods.
Rule-based checks and learned pattern detection
Most AI form systems use a mix of rule-based checks and learned pattern detection.
Rule-based checks rely on clear cutoffs. If the knee moves inward past a set angle for a meaningful part of the rep, the system flags knee valgus. If the hip crease never drops below knee height, it marks insufficient depth.
Learned pattern detection picks up errors that depend on a mix of metrics, timing, and context. A squat can slowly turn into a hip hinge without crossing one obvious threshold, but a trained model can still catch the pattern. The same goes for shoulder drift on the bench press, which is harder to spot with a single cutoff.
With those two methods working together, the system can flag the most common issues for each lift.
Common errors by exercise
For squats, the most common flags are knee valgus, heel lift, limited depth, and too much forward lean.
For bench press, the main targets are elbow flare, shoulder drift, and inconsistent bar path.
For deadlifts, the three most flagged errors are lumbar rounding, hips rising faster than the shoulders off the floor, and the bar drifting away from the shins.
One detail matters here: the hip-rise check compares the relative speed of hip and shoulder ascent instead of checking one single frame. That makes the result more reliable across different body types and loads.
Comparison table: overlays, text cues, and score summaries
AI usually delivers fault flags in three formats: overlays, text cues, and score summaries.
| Feedback Type | Clarity | Speed of Learning | Best Use Case |
|---|---|---|---|
| Visual Overlays | High - shows the exact joint position and bar path | Fast - immediate visual reference | Spotting bar path drift, knee cave, or depth issues |
| Text Cues | High - actionable coaching language | Moderate - requires mental processing before the next set | Correcting specific habits like chest up or push through heels |
| Score Summaries | Moderate - high-level overview of overall technique | Slow - useful for tracking trends over weeks | Monitoring whether form improvements are holding across sessions |
Each format does a slightly different job. Overlays show where the problem happened. Text cues tell you what to change. Score summaries help you see if your form is getting better from session to session.
That makes the next move pretty simple: pick one correction and work on it in the next session.
How to Use AI Feedback to Improve Your Form Over Time
A simple workflow from recording to next-session adjustments
When AI flags a fault, treat your next workout like a small test.
Record the same lift from the same angle each time. Then review the flagged errors, pick one correction, apply it, and check the result in the next session. That matters because if you change three things at once, it gets hard to tell what fixed the problem.
The best fix usually comes from a cue that matches the exact movement error. If the issue is knee collapse, the cue should address knee position. If the issue is bar drift, the cue should address the bar path. Simple, direct, and tied to what your rep is doing.
Why personalized cues work better than generic tips
Generic advice like "keep your knees aligned" gives you a target, but not much to do with it.
That’s the problem. A broad tip can sound good and still be hard to use under the bar. Specific cues linked to your own rep pattern are easier to apply and easier to repeat. For example, a cue like "push your knees over your mid-foot on the way down" gives you one clear action instead of a vague reminder.
CueForm AI turns detected faults into that kind of direct coaching language. And if a cue doesn’t click, you can ask the AI coach what the cue should feel like or whether there’s another option for the same pattern. That back-and-forth helps a lot when you’re trying to match feedback to a specific goal, whether that means hitting powerlifting depth standards or getting back to training after an injury.
Conclusion: What AI can and cannot tell you
AI can help you clean up technique, but it can’t judge every part of a lift.
It can flag repeatable errors like knee valgus, depth issues, or bar drift. It can also track whether your form is getting better over time. But it can’t measure pain, fatigue, or parts of your anatomy that the camera can’t pick up.
That’s where human judgment still matters, especially if the same error keeps showing up across multiple sessions even when you’re using the same cue work consistently.
FAQs
How accurate is AI form analysis?
AI form analysis can reach over 95% accuracy when it spots technique issues by tracking body landmarks and joint angles.
That means it can give precise, real-time feedback that often goes beyond what a human can catch with the naked eye.
What camera angle works best for each lift?
For each lift, set your smartphone or camera at hip-to-waist height, about 3 feet away. Make sure your full body is clearly in frame.
If you want a more detailed review, record from a few angles:
- Front
- Left side
- Right side
Can AI catch problems caused by fatigue or pain?
Yes. AI can spot issues linked to fatigue or pain by detecting form breakdowns and compensation patterns in real time, such as knee valgus collapse or spinal flexion.
That means it can help prevent injuries and flag fatigue-related problems as they start to show up.