AI Squat Depth Analysis for Injury Prevention
Bad squat depth can shift stress to your knees, hips, and lower back fast. I’d sum up this topic like this: if I use AI video feedback, I can check depth, knee tracking, torso lean, heel lift, and side-to-side hip drift with more accuracy than a mirror or a quick glance.
Here’s the short version:
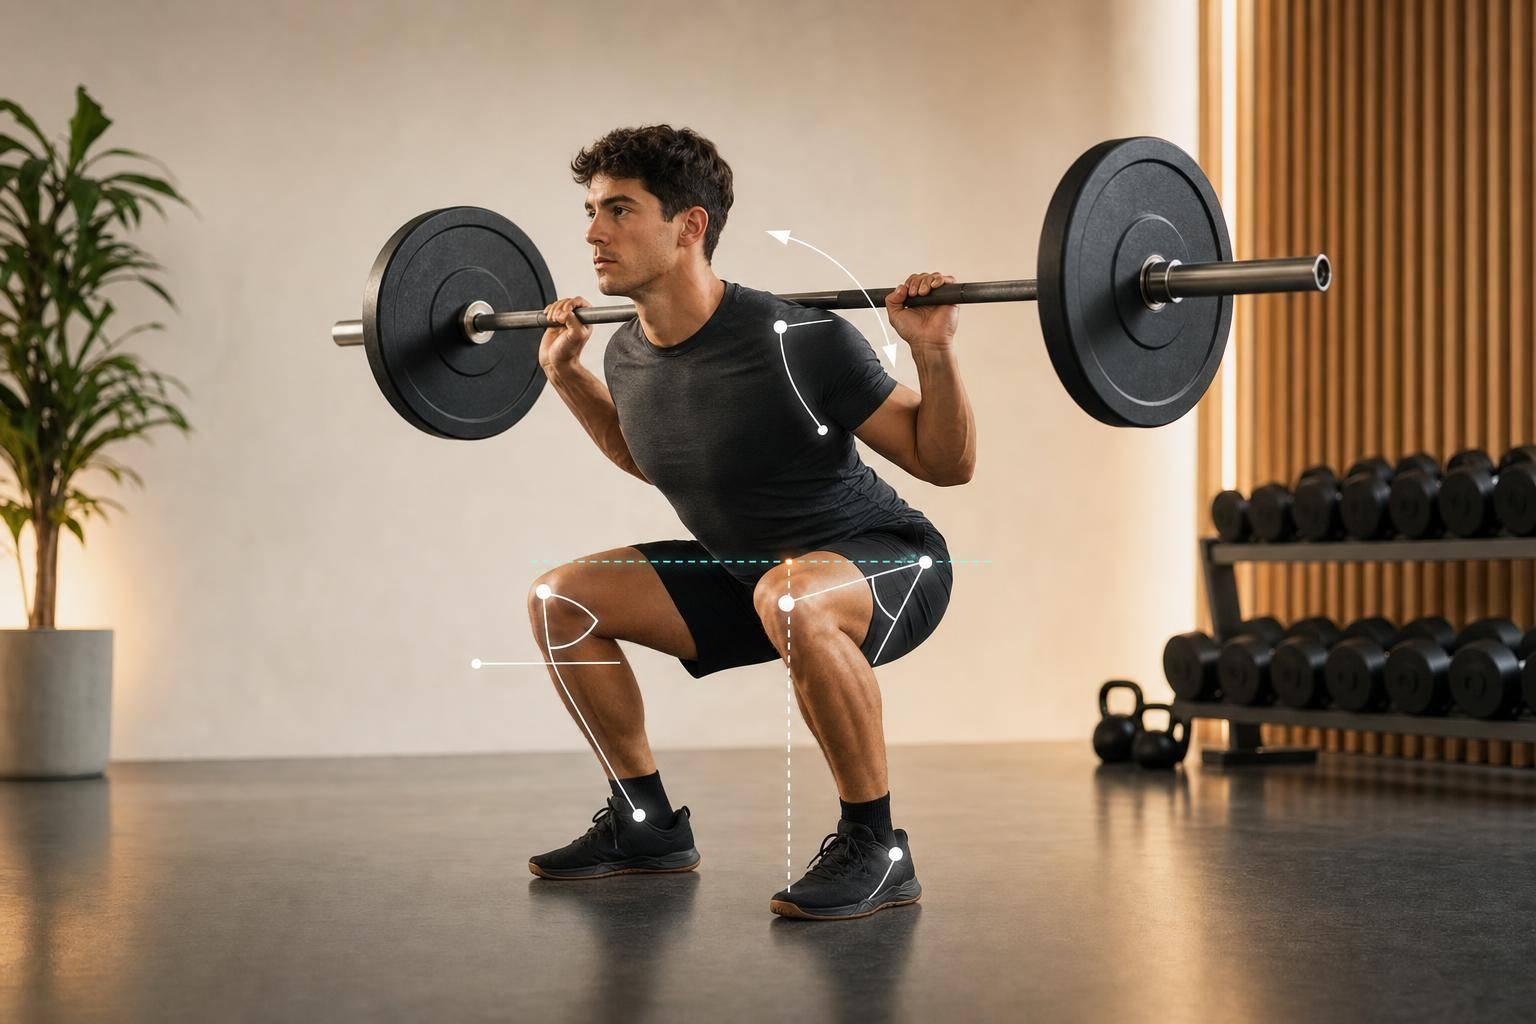
- Depth is not a guess. I check whether the hip crease gets to or below the top of the knee.
- Too shallow can put more load on the knees.
- Too deep for my mobility can lead to butt wink, which means the low back rounds at the bottom.
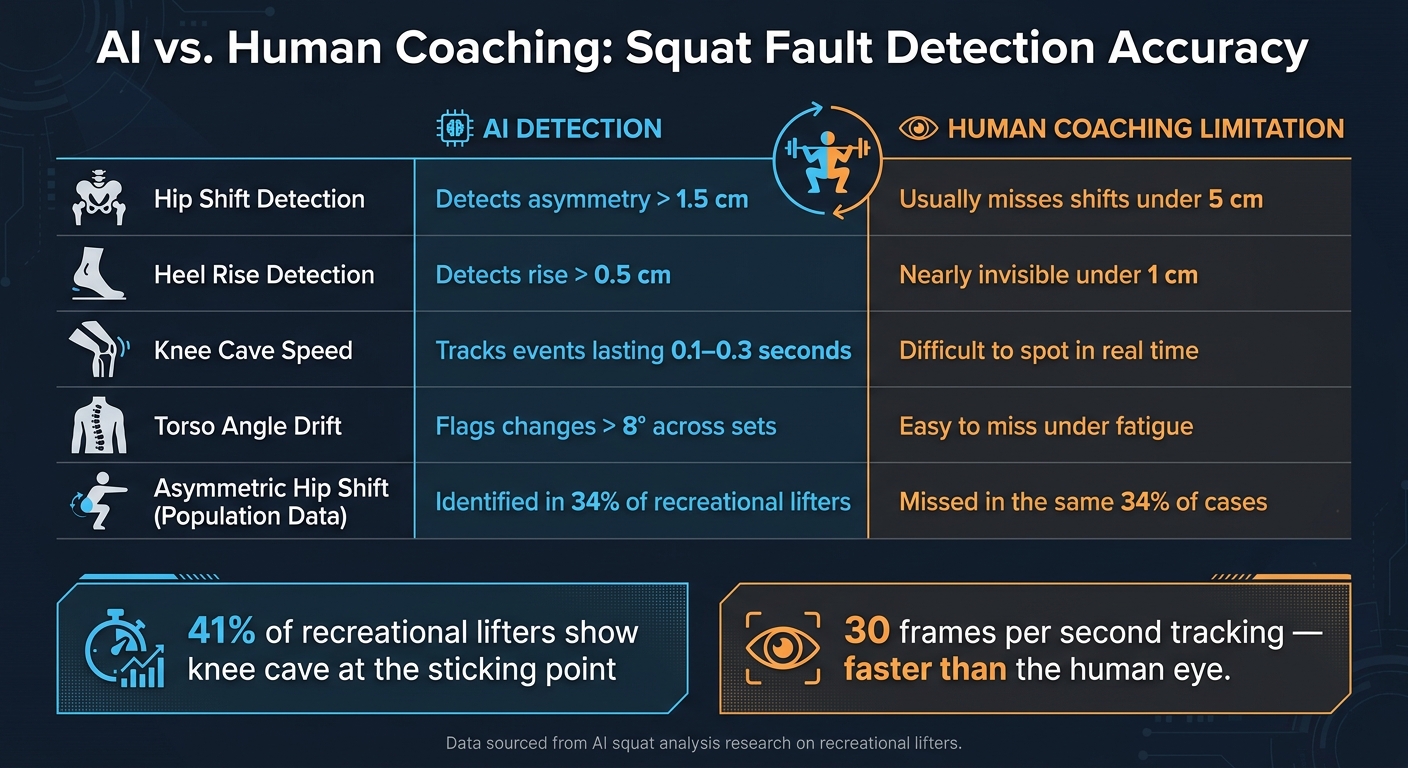
- Fast faults are easy to miss. Knee cave can happen in 0.1 to 0.3 seconds.
- AI can spot small changes like hip shift over 1.5 cm and heel lift over 0.5 cm.
- Fatigue often shows up as more torso lean or less depth by later sets.
- The fix depends on the pattern: ankle work for heel lift, load changes for fatigue, stance changes for butt wink, and single-leg work for left-right imbalance.
A few numbers stand out:
- 41% of recreational lifters show knee cave at the sticking point
- 34% show steady side-to-side hip drift that coaches may miss
- A torso angle change of more than 8° across sets can point to form drop
My takeaway: AI squat analysis works best when I use a side view for depth and torso angle, plus a front or rear view for knee tracking and hip drift. Then I can make plain changes to depth, mobility, stance, or load before small issues turn into pain.
Below, I’ll break down what squat depth means, what AI can measure, and how I’d use that feedback in training.
Squat Depth Errors and Where Injuries Occur
Shallow, Parallel, and Deep Squats: How to Tell Them Apart
Squat depth isn’t about how low a rep looks. It comes down to one simple check: where your hip crease sits compared to the top of your knee. That’s the benchmark most coaches and researchers use [1][6].
| Squat Category | Definition | Depth Marker |
|---|---|---|
| Shallow | Hip crease stays above the knee | Less than 90° of knee flexion [6] |
| Parallel | Hip crease is level with or slightly below the top of the knee | Thigh parallel to the floor [4] |
| Deep | Hip crease clearly below the knee | Requires enough hip and ankle mobility to avoid lumbar rounding |
The right depth is the deepest rep you can control without compensation. Go lower than your mobility allows, and you can end up with butt wink - lumbar flexion at the bottom of the squat. That shifts load away from the muscles and onto passive tissues such as the spinal ligaments [1][6]. CueForm AI flags lumbar rounding when lifters push past their mobility limits.
How Poor Depth Control Stresses the Knees, Hips, and Back
Once you know what depth looks like, the next step is spotting where control starts to break down.
Shallow squats put more braking demand on the knees and reduce help from the glutes and hamstrings. When you stop short of parallel, the knees take more of the braking force at a point where they’re less stable, which can increase shearing stress on the patellofemoral joint [7].
Pushing depth past your mobility limit creates a different problem. Butt wink rounds the lumbar spine under load. Over time, that repeated stress shifts more load onto passive tissues like spinal discs and ligaments, which can increase injury risk [1][7].
Another common issue is asymmetry. In a study of 847 recreational lifters, 34% showed steady asymmetric hip shifts of 2–4 cm that human coaches did not identify [3]. That kind of imbalance can load the spine and pelvis unevenly and may play a part in SI joint pain and hip flexor imbalances. AI video analysis can flag these asymmetries before they turn into recurring irritation [3].
Why Lifters Miss These Problems During Training
During heavy sets, small depth changes are easy to miss because hard effort narrows attention [7].
Fatigue makes that worse. A torso angle increase of more than 8° or a depth drop of more than 5% points to breakdown [3]. Those changes are often much easier to catch on video than while you’re still in the rack.
Creating Your Own AI Fitness Trainer: Analyzing Squats with MediaPipe
How AI Squat Depth Analysis Works
AI vs. Human Coaching: Squat Fault Detection Accuracy
Video-Based Pose Tracking and Depth Measurement
AI squat analysis starts with a smartphone camera. You film a short set, upload the video, and the system starts processing it.
From there, the AI uses pose tracking to follow key joints frame by frame at 30 frames per second [3].
That frame rate matters. A lot of squat mistakes happen in a blink, faster than most people can catch by watching in real time. Instead of relying only on a coach’s eye, the system measures depth the same way on every rep with frame-by-frame depth measurement [3].
| Metric | AI Detection Capability | Human Coaching Limitation |
|---|---|---|
| Hip Shift | Detects asymmetry > 1.5 cm [3] | Usually misses shifts under 5 cm [3] |
| Heel Rise | Detects rise > 0.5 cm [3] | Nearly invisible under 1 cm [3] |
How AI Detects Unsafe Compensations During Deep Reps
Once depth can be measured, the next job is spotting the movement changes that can make deep reps risky.
Depth by itself doesn’t tell the whole story. The system tracks knee valgus by watching hip-knee-ankle alignment and flags inward knee collapse, which can stress the ACL and medial knee structures [1][2]. It also looks at torso angle in relation to the hips to catch butt wink (lumbar flexion), and it monitors ankle and foot contact points to detect heel rise [1].
Some of these issues happen FAST. Knee cave at the sticking point often lasts only 0.1 to 0.3 seconds, which makes it hard to spot with steady accuracy without automated tracking [3].
This is where the feedback becomes useful in the gym, not just interesting on paper. Specific numbers - like a torso angle increase of more than 8° between the first and last sets - tie straight to cues you can use, so you can fix the issue before it turns into a habit [2][3].
Where CueForm AI Fits in Practical Lifting Feedback
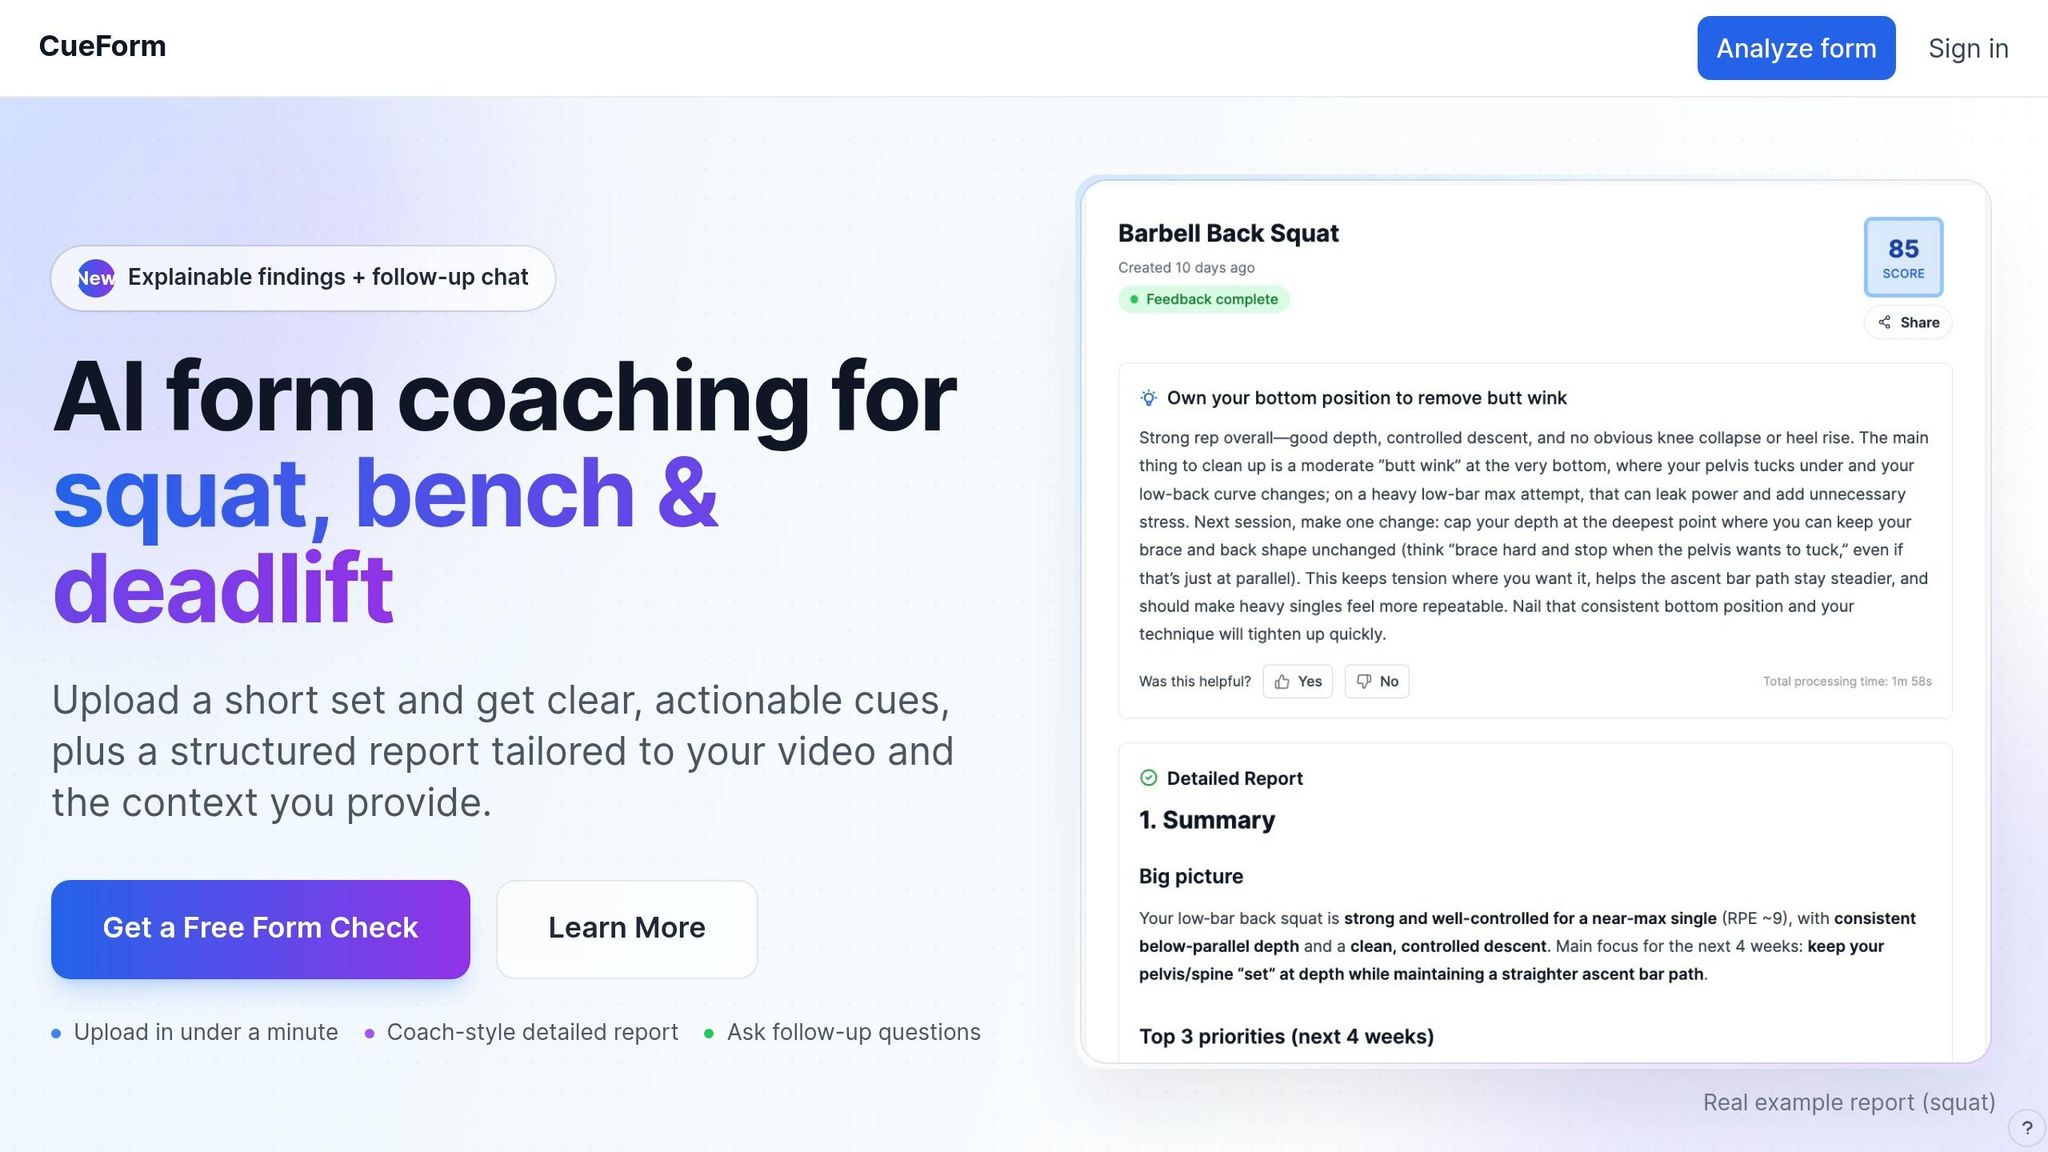
CueForm AI takes those measurements and turns them into rep-by-rep feedback you can use during training.
You upload a set, and the system gives feedback based on the movement it found, including depth consistency, hip shift, heel rise, valgus, and lumbar rounding [2]. If you want to dig deeper, you can also use AI coach chat for follow-up questions tied to your movement patterns and training goals [2].
How AI Depth Analysis Lowers Injury Risk
Once AI can measure squat depth and compensations, the next move is using that data to cut injury risk.
Heavier loads make small depth mistakes matter more. AI tracks range of motion on every rep, so lifters don’t end up chasing short-range-of-motion PRs that slowly trim squat depth without them noticing, which helps keep depth steady from rep to rep [5]. When fatigue kicks in, AI can flag form breakdown before it turns into a habit - catching torso angle drift beyond 8°, such as the good morning squat, knee cave beyond 5°, and asymmetric hip shift early [1][3]. That kind of feedback helps lifters see when it’s time to adjust depth, load, or mobility work before common squat form mistakes become routine.
How to Use AI Squat Depth Analysis in Your Training
Camera Angles and Metrics Worth Tracking
Once AI measures the rep, the next step is simple: use that data to clean up your training.
The side view is the best angle for checking squat depth because it lets the AI confirm whether your hip crease drops below the top of your knee. It also helps track your torso angle through the entire rep [1][5].
A front or rear view adds another layer. That angle helps you check knee tracking and side-to-side hip shifts, since those issues don't show up well from the side.
Make sure your full body stays in frame, and record at the highest frame rate your phone supports. Clear, even lighting helps the AI read the movement more accurately.
Pay attention to these metrics from rep to rep and from session to session:
- Depth at the hip crease
- Knee valgus angle
- Torso lean
- Lateral hip shift
- Heel contact
Use the same camera setup every session. That way, changes in depth, torso tilt, and hip shift are much easier to spot.
How to Adjust Depth, Mobility, and Load Based on Feedback
When AI flags an issue, the next move depends on the cause. The best approach is to pair each error with one direct fix.
| AI-Detected Issue | Likely Cause | What to Do |
|---|---|---|
| Heel rise (>0.5 cm) [3] | Limited ankle dorsiflexion | Ankle dorsiflexion drills or heel wedges as a temporary fix [3] |
| Butt wink at the bottom | Limited hip or ankle mobility, or a stance that is too narrow | Widen your stance, toe out slightly, or cap depth until control returns [5] |
| Torso angle drifts more than 8° across sets [3] | Fatigue | Drop load 10% to 15% and use goblet squats to reinforce upright posture [1][3] |
| Knee cave at the sticking point | Weak hip stabilizers | Banded squats and the cue "spread the floor" [3] |
| Uneven hip shift | Strength imbalance between legs | Add Bulgarian split squats on the weaker side [3] |
If depth keeps changing from rep to rep, box squats can help. They build awareness of your target position and make it easier to hit that same depth under load [3][5].
Conclusion: Safer Squats Start with Measurable Feedback
Squat depth changes how much stress lands on your knees, hips, and lower back. Most lifters aren't great at judging their own depth or spotting compensation patterns in real time, especially when the bar gets heavy. AI helps fill that gap by measuring each rep objectively and flagging breakdowns before they turn into habits.
CueForm AI brings that into day-to-day training. You can upload your squat video, get personal feedback on depth, torso angle, and knee tracking, then follow up with an AI coach to ask specific questions tied to your goals.
For lifters training without a coach, measured feedback helps keep squat depth honest, spots drift early, and can lower injury risk.
FAQs
How do I know if I’m squatting too deep for my mobility?
Your ideal squat depth is personal. It depends on things like your mobility, your training goal, past injuries, and your body structure. That includes hip shape, ankle dorsiflexion, and femur length.
Going deeper isn’t always better. If your form falls apart at the bottom, you’re probably going too deep for your body right now. Common signs include butt wink or too much forward torso lean.
If you have a history of patellofemoral injury, stick to a pain-free range. That’s the safer move.
CueForm AI can review your squat videos and flag depth-related compensations, so you can see where your form starts to change.
Can AI catch form breakdown when I get tired?
Yes. AI can catch form breakdown as you get tired, even the small shifts that are easy to miss in the moment.
CueForm AI tracks your movement across sets and sessions. It compares later reps with earlier ones to spot patterns like extra torso lean or changes in squat depth. That makes the feedback more immediate and more objective.
What camera angle works best for squat analysis?
A side view is the best angle for squat analysis because it makes the main form markers easier to see: hip depth, knee angle, back position, and bar path.
For clean tracking, set the camera on a stable surface about 8 to 12 feet away. That usually gives you enough space to keep your full body in frame from start to finish.
Front and rear views can still help, especially if you want to check left-to-right balance. But for injury-prevention analysis, the side view is the standard.